ServiceMesh 3:路由控制(图文总结)
★ ServiceMesh系列
1 Istio部署
1.1 连接测试机
进入测试机服务器...
1.2 安装Istio
1.2.1 通过官方网站下载Istio
 # 下载最新版本的Istio
$ curl -L https://istio.io/downloadIstio | sh -

# 或者下载指定版本:
$ curl -L https://istio.io/downloadIstio | ISTIO_VERSION=1.8.6 TARGET_ARCH=x86_64 sh -
1.2.2 检查安装目录
如果安装的是1.8.6的版本,我们就可以直接进入到这个目录下,并查看该目录下的文件信息
[CCE~]$ cd /
[CCE~]$ cd /home/work/istio-1.8.6
[CCE~]$ ls -l

total 48
drwxr-x---  2 work work  4096 Nov  4 15:13 bin   # istioctl 客户端二进制文件
-rw-r--r--  1 work work 11348 Nov  4 15:13 LICENSE
drwxr-xr-x  5 work work  4096 Nov  4 15:13 manifests
-rw-r-----  1 work work   767 Nov  4 15:13 manifest.yaml
-rw-r--r--  1 work work  4183 Nov  4 15:13 productpage
-rw-r--r--  1 work work  5866 Nov  4 15:13 README.md
drwxr-xr-x 19 work work  4096 Nov 16 10:49 samples  # 示例应用程序
drwxr-x---  3 work work  4096 Nov  4 15:20 tools
1.2.3 环境变量配置
使用export生成环境变量PATH,将 istioctl 客户端加入搜索路径
$ export PATH=$PWD/bin:$PATH
1.2.4 安装Istio
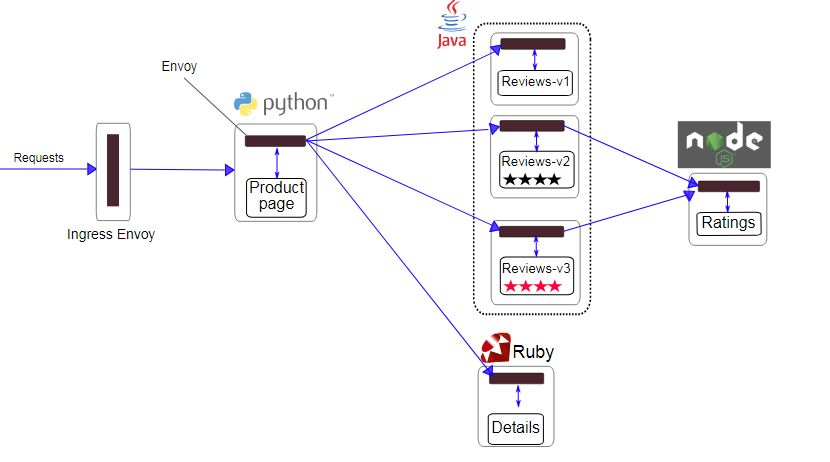
使用 istioctl 安装 Istio,可以看出,它不仅安装了Istio核心主程序,还包含了以下几个核心组件:
- Istiod # 核心控制面
- Egress gateways # 出流量路由
- Ingress gateways # 入流量路由
[CCE~]$ istioctl install --set profile=demo -y

✔ Istio core installed
✔ Istiod installed
✔ Egress gateways installed
✔ Ingress gateways installed
✔ Installation complete
1.2.5 检查是否安装成功
默认的namespace 和 pod 应该已经正常创建(安装istio的时候,会默认创建 istio-system 命名空间),这边确认下:
[root@k8s-master ~]# kubectl get ns |grep istio
istio-system      Active   82m
[root@k8s-master ~]# kubectl get pods -n istio-system
NAME                                    READY   STATUS    RESTARTS   AGE
istio-egressgateway-xxxxxxxxxx-xxxxx    1/1     Running   0          2m33s
istio-ingressgateway-xxxxxxxxxx-xxxxx   1/1     Running   0          2m33s
istiod--xxxxxxxxxx-xxxxx                1/1     Running   0          3m7s
1.2.6 安装Istio自带示例BookInfo
因为我们要测试图书示例系统,所以我们建设一个恰当的命名空间名称:
istio-booking-demo
[CCE~]$ kubectl create namespace istio-booking-demo  # Create a namespace
[CCE~]$ kubectl get namespace

NAME                 STATUS   AGE
default              Active   23d
icp                  Active   14d
ingress-nginx        Active   23d
istio-booking-demo   Active   16s
istio-system         Active   22d
kube-node-lease      Active   23d
kube-public          Active   23d
kube-system          Active   23d
local-path-storage   Active   23d
1.2.7 设置Pod自动注入SideCar
给命名空间加上标签,指示Istio在部署应用的时候,自动注入Evnoy SideCard代理。
[CCE~]$ kubectl label namespace istio-booking-demo istio-injection=enabled
namespace/istio-booking-demo labeled
★ 说明:这个代表该命名空间(istio-booking-demo)下部署的Pod中都会自动注入Envoy数据面,即使没有配置任何策略,流量依旧会被数据面Envoy拦截并透传给服务。
1.2.8 设置别名,简化操作
可以对某些命名空间下的操作设置别名,避免每一次都输入太长
[CCE~]$ alias kb='kubectl -n istio-booking-demo -o wide'  # 设置别名
[CCE~]$ alias kb  # 查看别名
alias kb='kubectl -n istio-booking-demo -o wide'
1.3 部署实例应用
1.3.1 检查示例目录
查看下Istio 自带的BookInfo示例的地址,可以看到有好几个目录,如下:
[CCE~ kube]$ cd /
[CCE~ /]$ cd /home/work/istio-1.8.6/samples/bookinfo/
[CCE~ bookinfo]$ ls -l
total 32
-rwxr-xr-x 1 work work 4029 Nov  4 15:13 build_push_update_images.sh
drwxr-xr-x 2 work work 4096 Nov 16 10:11 networking
drwxr-xr-x 3 work work 4096 Nov  4 15:13 platform
drwxr-xr-x 2 work work 4096 Nov 16 15:04 policy
-rw-r--r-- 1 work work 1306 Nov  4 15:13 README.md
drwxr-xr-x 8 work work 4096 Nov 16 15:06 src
-rw-r--r-- 1 work work 6329 Nov  4 15:13 swagger.yaml
1.3.2 部署
部署Bookinfo 示例应用,应用bookinfo的yaml配置:
$ kb apply -f platform/kube/bookinfo.yaml

service/details created
serviceaccount/bookinfo-details created
deployment.apps/details-v1 created
service/ratings created
serviceaccount/bookinfo-ratings created
deployment.apps/ratings-v1 created
service/reviews created
serviceaccount/bookinfo-reviews created
deployment.apps/reviews-v1 created
deployment.apps/reviews-v2 created
deployment.apps/reviews-v3 created
service/productpage created
serviceaccount/bookinfo-productpage created
deployment.apps/productpage-v1 created
1.3.3 检查部署结果
应用部署之后,检查 Services 和 Pods 的部署情况,就可以发现,Pod准备就绪时,Istio的 边车Envoy 会一起打包部署进去。
确保所有的 Pod 达到此状态: 就绪状态(READY)的值为 2/2 、状态(STATUS)的值为 Running 。
[CCE~ bookinfo]$ kb get services
NAME          TYPE        CLUSTER-IP      EXTERNAL-IP   PORT(S)    AGE   SELECTOR
details       ClusterIP   10.11.12.111   <none>        9080/TCP   28d   app=details
productpage   ClusterIP   10.11.12.112   <none>        9080/TCP   28d   app=productpage
ratings       ClusterIP   10.11.12.113   <none>        9080/TCP   28d   app=ratings
reviews       ClusterIP   10.11.12.114    <none>        9080/TCP   28d   app=reviews
[CCE~ bookinfo]$ kb get pods
NAME                              READY   STATUS    RESTARTS   AGE   IP             NODE    NOMINATED NODE   READINESS GATES
details-v1-xxxxxxxxxx-xxxxx        2/2     Running   0          28d   10.233.67.8    CCE.01   <none>           <none>
productpage-v1-xxxxxxxxxx-xxxxx   2/2     Running   0          28d   10.233.67.10   CCE.01   <none>           <none>
ratings-v1-xxxxxxxxxx-xxxxx        2/2     Running   0          22d   10.233.67.11   CCE.01   <none>           <none>
reviews-v1-xxxxxxxxxx-xxxxx       2/2     Running   0          28d   10.233.68.4    CCE.02   <none>           <none>
reviews-v2-xxxxxxxxxx-xxxxx       2/2     Running   0          22d   10.233.68.6    CCE.02   <none>           <none>
reviews-v3-xxxxxxxxxx-xxxxx         2/2     Running   0          28d   10.233.67.9    CCE.02   <none>           <none>
1.3.4 验证安装是否成功
验证下是否安装成功,看下是否某个页面可以被读取到
[CCE~ bookinfo]$ kubectl -n istio-booking-demo exec "$(kubectl -n istio-booking-demo get pod -l app=ratings -o jsonpath='{.items[0].metadata.name}')" -c ratings -- curl -s productpage:9080/productpage | grep -o "<title>.*</title>"
<title>Simple Bookstore App</title>
1.3.5 配置流量Inbound
关联Istio网关,并确保配置文件正常,应用 bookinfo-gateway的yaml配置:
$ kubectl apply -f networking/bookinfo-gateway.yaml
gateway.networking.istio.io/bookinfo-gateway created
virtualservice.networking.istio.io/bookinfo created
$ istioctl analyze
✔ No validation issues found when analyzing namespace: default.
1.3.6 绑定NodePort
获取ingressgateway的详细信息,会发现 EXTERNAL-IP 为none,就直接改yaml,绑定nodePort的端口,映射为8601。验证访问
[CCE~]$ kb get svc istio-ingressgateway -n istio-system
NAME                   TYPE       CLUSTER-IP      EXTERNAL-IP   PORT(S)                                                                     AGE   SELECTOR
istio-ingressgateway   NodePort   10.233.32.219   <none>        15021:24534/TCP,80:8601/TCP,443:31159/TCP,31400:23074/TCP,15443:13324/TCP   28d   app=istio-ingressgateway,istio=ingressgateway
#  ========================================================

[CCE ~]$ kubectl edit svc istio-ingressgateway -n istio-system   # 编辑完输入 :wq 退出
spec:
  clusterIP: 10.233.32.219
  externalTrafficPolicy: Cluster
  ports:
  - name: status-port
    nodePort: 24534
    port: 15021
    protocol: TCP
    targetPort: 15021
  - name: http2
    nodePort: 8601
    port: 80
    protocol: TCP
    targetPort: 8080
  - name: https
    nodePort: 31159
    port: 443
    protocol: TCP
    targetPort: 8443
  - name: tcp
    nodePort: 23074
    port: 31400
    protocol: TCP
    targetPort: 31400
  - name: tls
    nodePort: 13324
    port: 15443
    protocol: TCP
    targetPort: 15443
  selector:
    app: istio-ingressgateway
    istio: ingressgateway
  sessionAffinity: None
  type: NodePort
1.4 安装仪表盘
应用服务安装完成之后,需要安装很多相关仪表板进行可视化管理。包括 kiali监控 、k8s 仪表盘、Grafana(BI报表)、Jaeger Trace系统
1.4.1 Kiali 仪表盘安装
[CCE~ samples]$ cd samples/addons
[CCE~ addons]$ ls -l # 包含4个可视化系统:grafana、jaeger、kiali、prometheus
total 304
drwxr-xr-x 2 work work   4096 Nov  4 15:13 extras
-rw-r--r-- 1 work work 240054 Nov  4 15:13 grafana.yaml
-rw-r--r-- 1 work work   2317 Nov  4 15:13 jaeger.yaml
-rw-r--r-- 1 work work  35080 Nov  4 15:13 kiali.yaml
-rw-r--r-- 1 work work  13250 Nov  4 15:13 prometheus.yaml
-rw-r--r-- 1 work work   5186 Nov  4 15:13 README.md

# 安装Kiali和其他插件,等待部署完成!
$ kubectl apply -f samples/addons
$ kubectl rollout status deployment/kiali -n istio-system
Waiting for deployment "kiali" rollout to finish: 0 of 1 updated replicas are available...
deployment "kiali" successfully rolled out


# 访问仪表盘,ctl+c 退出当前读取
[CCE~ addons]$ istioctl dashboard kiali
http://localhost:20001/kiali
[CCE~ addons]$ istioctl dashboard grafana
http://localhost:3000
[CCE~ addons]$ istioctl dashboard jaeger
http://localhost:16686
[CCE~ addons]$ istioctl dashboard prometheus
http://localhost:9090
# 实际上的外部访问地址跟 1.3.6 的做法一致
# 先查一下整个集群的所有namespace的情况
$ kb get service --all-namespaces
# 查一下具体的服务信息
$ kb get service --all-namespaces | grep grafana
# 进行nodePart端口绑定
$ kubectl edit svc grafana -n istio-system  # nodePort的端口绑定 8663
$ kubectl edit svc kiali -n istio-system  # nodePort的端口绑定 8661
$ kubectl edit svc prometheus -n istio-system # nodePort的端口绑定 8664
$ kubectl edit svc tracing -n istio-system # nodePort的端口绑定 8665,jaeger
备注:官方也提供了部署的步骤,可以参考下 搭建步骤
2 Istio能力介绍
2.1 简要介绍
Istio具备丰富的流量治理能力,可以参考官方提供的丰富的测试案例,包含但不限于请求路由配置、故障注入、流量转移、TCP 流量转移、请求超时、熔断、流量镜像、地域负载均衡、Ingress+Egress
2.2 请求路由配置
2.2.1 请求路由调度
请求路由中有一种普遍的需求:就是把让不同的用户群体看到的信息不一样,比如VIP用户和普通用户看到的内容不一样,折扣价也不一样;又比如登录用户和未登录用户看到的信息也不一样。
2.2.1 路由初始化
先应用 virtual-service-all-v1,会把所有请求流量都指向版本1的服务(即Virtual Service版本都指向v1), virtual-service-all-v1.yaml
应用yaml
[CCE ~]$ cd /
[CCE /]$ cd /home/work/istio-1.8.6/samples/bookinfo/
[CCE bookinfo]$ kubectl -n istio-booking-demo apply -f networking/virtual-service-all-v1.yaml
virtualservice.networking.istio.io/productpage unchanged
virtualservice.networking.istio.io/reviews unchanged
virtualservice.networking.istio.io/ratings unchanged
virtualservice.networking.istio.io/details unchanged
路由规则
[CCE bookinfo]$ kb get virtualservices -o yaml # 查看所有的virtualservices
[CCE bookinfo]$ kb get destinationrules -o yaml # 查看所有的destinationrules
[CCE bookinfo]$ kb get virtualservices reviews -o yaml # 查看reviews的virtualservices
apiVersion: networking.istio.io/v1beta1
kind: VirtualService
metadata: # 数据不重要,这边屏蔽掉
spec:
  hosts:
  - reviews
  http:
  - route:
    - destination: # 指向 reviews 服务的v1版本
        host: reviews
        subset: v1
[CCE bookinfo]$ kb get virtualservices ratings -o yaml # 查看ratings的virtualservices
apiVersion: networking.istio.io/v1beta1
kind: VirtualService
metadata: # 数据不重要,这边屏蔽掉
spec:
  hosts:
  - ratings
  http:
  - route:
    - destination:  # 指向 ratings 服务的v1版本
        host: ratings
        subset: v1
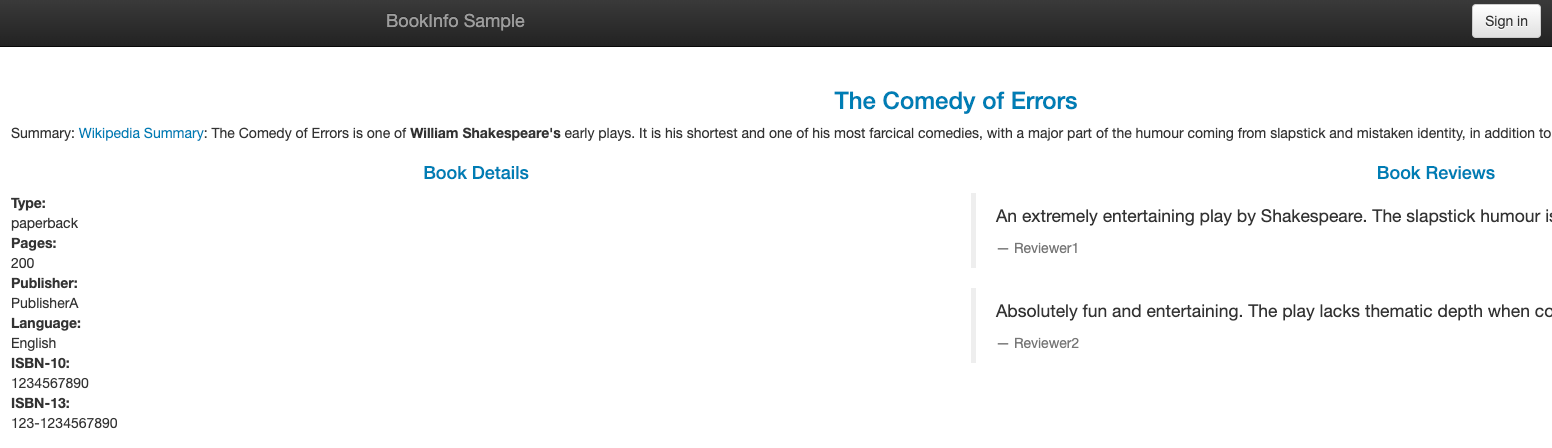
打开 界面,你会发现无论怎么刷新页面,都不会显示星级,那是因为reviews:v1版本不会访问星级评分服务。
2.2.2 基于用户身份的路由
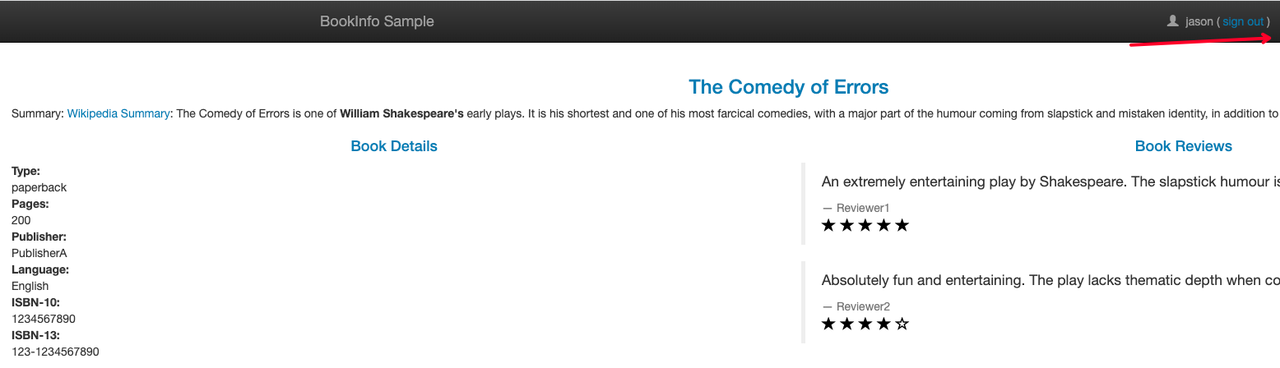
做一下调整,让Jason用户的流量转发到 reviews:v2,具体做法是请求Header中 end-user 有具体的人员名称Jason。 virtual-service-reviews-test-v2.yaml
[CCE bookinfo]$ kubectl -n istio-booking-demo apply -f networking/virtual-service-reviews-test-v2.yaml
virtualservice.networking.istio.io/reviews configured
[CCE bookinfo]$ kb get virtualservices reviews -o yaml
apiVersion: networking.istio.io/v1beta1
kind: VirtualService
metadata: # 数据不重要,这边屏蔽掉
spec:
  hosts:
  - reviews
  http:
  - match:
    - headers: # header中带end-user并且值为jason用户的流量走v2版本,其他走v1版本
        end-user:
          exact: jason
    route:
    - destination:
        host: reviews
        subset: v2
  - route:
    - destination:
        host: reviews
        subset: v1
对比一下2.2.1,你会发现差别,这边的reviews服务的在特定的jason用户下会走到v2版本中,效果如下,可以看到ratings服务的星星评价了。
- productpage → reviews:v2 → ratings (针对 jason 用户)
- productpage → reviews:v1 (其他用户)
2.2.3 清除应用程序 Virtual Service
如果不需要规则可以直接删除,删除完,所有的路由规则都不存在了,只剩各个Pod之间的SideCar拦截。
[CCE bookinfo]$ kubectl -n istio-booking-demo delete -f networking/virtual-service-all-v1.yaml
3 总结
本文介绍了Istio的部署和简单的路由实现,后续的章节将探索更多精彩的内容。
- 复杂路由调度
- 故障注入
- 流量转移
- TCP 流量转移
- 请求超时
- 熔断
- 流量镜像
- 地域负载均衡
- Ingress+Egress
- ServiceEntry
以上就是电脑114游戏给大家带来的关于ServiceMesh 3:路由控制(图文总结)全部内容,更多攻略请关注电脑114游戏。
电脑114游戏-好玩游戏攻略集合版权声明:以上内容作者已申请原创保护,未经允许不得转载,侵权必究!授权事宜、对本内容有异议或投诉,敬请联系网站管理员,我们将尽快回复您,谢谢合作!

